This HOWTO describes a procedure for accessing location-restricted web content on the Internet. The process is generic, though, and can be applied to other situations in which there is a need to obfuscate or encrypt web traffic.
There are some "content providers" on the Internet that restrict access to services based on the physical location of the customer. Some of these providers only allow access to customers from a specific country. Other providers have arcane and antiquated blackout policies that prevent paying customers from viewing content if they live in certain cities or zip codes. For example:
MLB's Blackout Policy
Look at this map to see how insane these restrictions can be:

Are you a Pirates fan who lives in Columbus, Ohio? Hopefully not, because Pirates games aren't shown on any local TV station and you are BLACKED OUT on mlb.tv. Do you live in Iowa? You won't be watching much baseball online if you do, which *really* sucks because there just isn't much else to do in Iowa.
The location of the customer is usually determined through geolocation of the customer's IP address. It is possible, however, to mask the true location through the use of a proxy server that is physically located elsewhere. There are several HOWTO documents on the Internet that describe how to use proxy servers, but finding a reliable public proxy server can be difficult. What if, instead, you could create your own private proxy server?
It's not as hard as you might think...
We are going to create a SOCKS proxy using SSH that will send all of your web browser traffic through an encrypted tunnel to a server in a remote location. To do this, you will need the following:
- A Linux server somewhere on the Internet
The server needs to be in a physical location that is permitted to access the content you want. If you have access to one already, great. If not, there are lots of companies that provide access to Linux servers for a monthly fee:
Linode - Virtual Linux servers starting at $20/month
UNIXShell - Virtual Linux servers starting at $20/month
JaguarPC - Virtual Linux servers starting at $20/month, located in Texas
BudgetDedicated - Virtual Linux servers located in the Netherlands
Bytemark - Virtual Linux servers located in the UK
This option is NOT free, but if you *really* want to watch your games/matches/races/tests/whatever on the Internet it's a small price to pay. If you intend to stream lots of video through your proxy you need to pay attention to the monthly bandwidth included with your service. Three hours of streaming video per day can bankrupt you if you're not careful...
- An SSH client that can create a SOCKS proxy
Windows: PuTTY
OSX, Linux: ssh
- A web browser that can be configured to use a SOCKS proxy.
Firefox, IE and Safari are all OK.
==================================================
A warning before we get started: Most content providers
use proprietary software and browser plug-ins to stream
their content. Some of these will not be fooled by
a simple proxy and may require the use of a VPN-like
tunnel. Setting up a VPN server, however, is not as
simple as the solution described below.
==================================================
Step 1) Set up your Linux server.
(You can obviously skip this if you already have a server with SSH.)
You can make this step as complicated or as simple as you like. If you choose to use one of the virtual server providers listed above you can be up and running in minutes. (I personally use Linode, but your needs may differ.) Each of these providers can set up a bare-bones virtual Linux server for you that has exactly what you need without requiring any further effort or technical knowledge. They will confirm your purchase and send you the IP address of your new system and the root password. This is all you need to SSH to your new system and get started.
(You might want to change your root password from the one they provide, but I'm not giving lessons in Linux server administration here.)
Step 2) Download an SSH client
Linux and OSX users should already have ssh.
Windows users: Download PuTTY
Save it wherever you like... just don't forget where you put it. You can use your own SSH client, but I'm not going to cover anything but PuTTY.
Step 3) Create the tunnel/proxy
Linux and OSX users:
man ssh. Look for the "-D" option:
'ssh -D1080 [username@linux-host-ip]'
(Now skip to the browser config.)
Windows users: Run PuTTY. You will see the following:
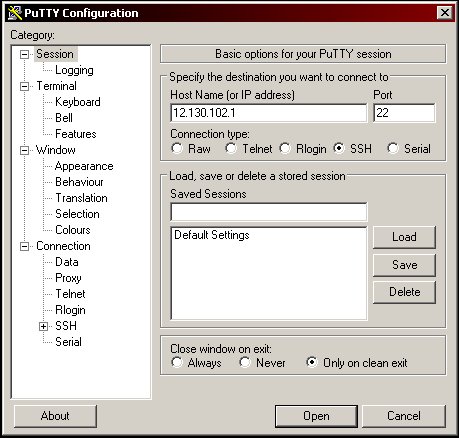
Enter the IP address of your Linux server in the "Host Name" box. The standard SSH port is 22, but if your SSH server is listening on a different port you can change it here.
Next, expand the "SSH" branch on the left and click on "Tunnels":
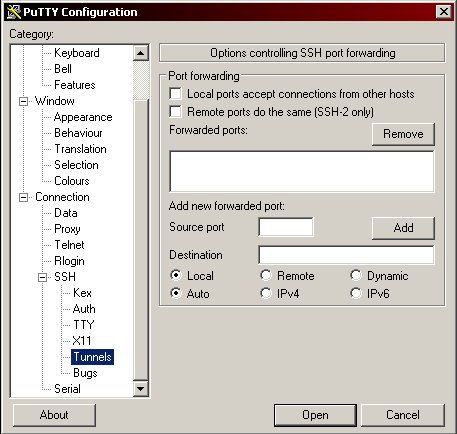
Select "Dynamic", then enter "1080" in the box labeled "Source port" and click "Add". After doing so your configuration should look like this:
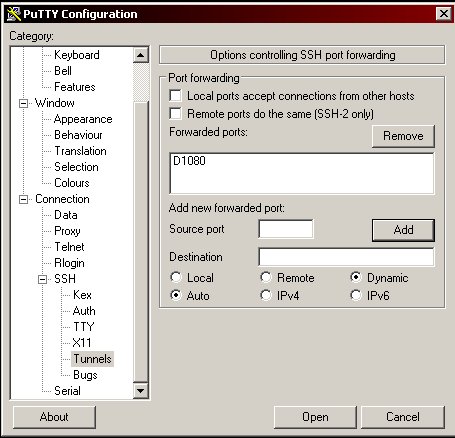
Now click "Open". Putty will now try to connect to your Linux server. If everything works you will be prompted with a security alert about the server's host key. Say YES and you will be prompted for the username and password on your server.
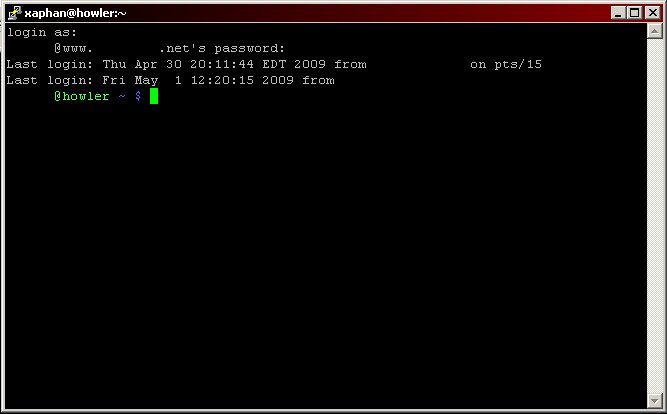
(I BLACKED OUT my info in the image above.) When you see the command prompt the tunnel has been created and you are DONE. You don't need to do anything else with this command prompt.
Step 4) Configure your browser to use the proxy.
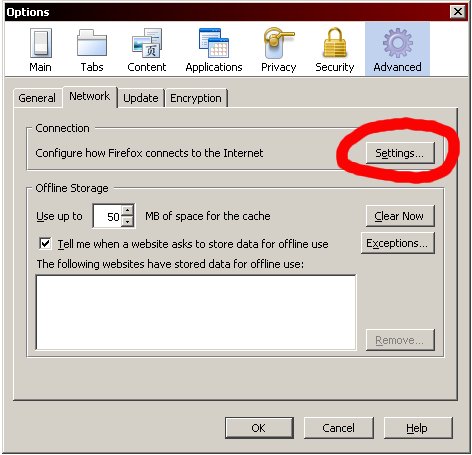
If you're using Firefox, click on the "Tools" menu, then "Options". In the Options dialog click Advanced, then select the "Network" tab and click the "Settings" button.
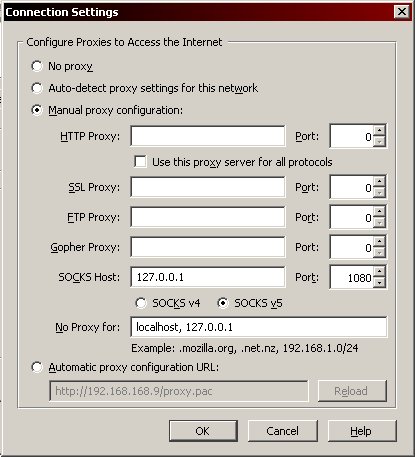
In the Connection Settings dialog, choose "Manual proxy configuration" and enter the IP address "127.0.0.1" in the "SOCKS Host" box. Make sure the port is 1080 and then click OK until you're back at your main browser window.
==================================================
If you can browse the Internet at this point you are done. Point your browser at whatever you couldn't access before and you should be able to see it. When you're done watching/browsing through the tunnel just type "exit" at the Linux command prompt and then reset your browser back to the default configuration.
If you play around with PuTTY you will find that you can create and save sessions. This makes creating the tunnel/proxy much easier...